Cài đặt API tích hợp (On-Premise)
Trang này hướng dẫn đội hạ tầng của Partner tự cài đặt cụm API ký số ("Sign Server") ngay trên hạ tầng của mình
Yêu cầu
Kiến trúc triển khai
Cụm API: Sign Server được cài đặt trực tiếp tại hạ tầng của đơn vị kết nối bằng bộ đóng gói API do Intrust DSS cung cấp, làm nhiệm vụ tiếp nhận yêu cầu ký số và chuyển xử lý lên Tổ chức cung cấp dịch vụ Chứng thực CKS công cộng IntrustCA.
Yêu cầu hạ tầng cụm cài API (tối thiểu 01, khuyến nghị 02):
| Hạng mục | Yêu cầu |
|---|---|
| Hệ điều hành | Windows Server 2019 Standard (hoặc cao hơn) |
| CPU | 8 Core |
| RAM | ≥ 16GB |
| .NET Framework | 4.7 |
| Mạng | Mở kết nối Internet |
Dịch vụ Web Server
API được chạy trên nền tảng IIS (Internet Information Services).
Cài đặt IIS
Cài IIS theo quy trình chuẩn của Windows Server (không có thao tác riêng của RMS):
-
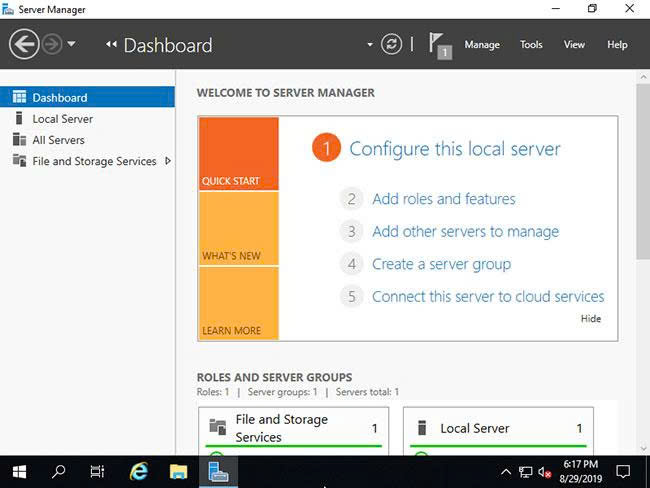
Chạy Server Manager và nhấp vào Add roles and features.
-
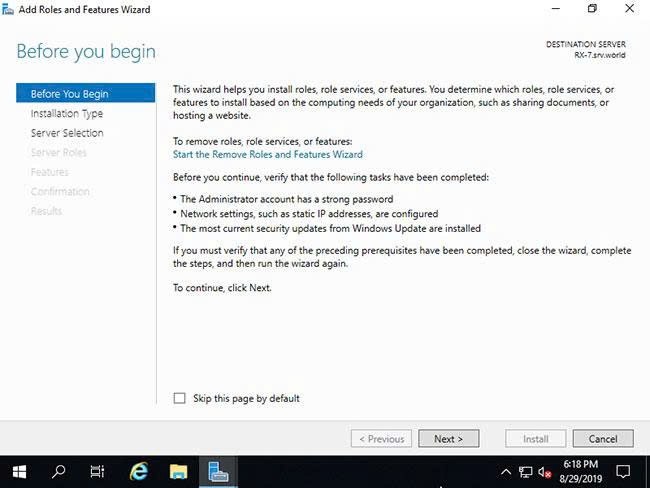
Nhấp vào nút Next (màn hình "Before you begin").
-
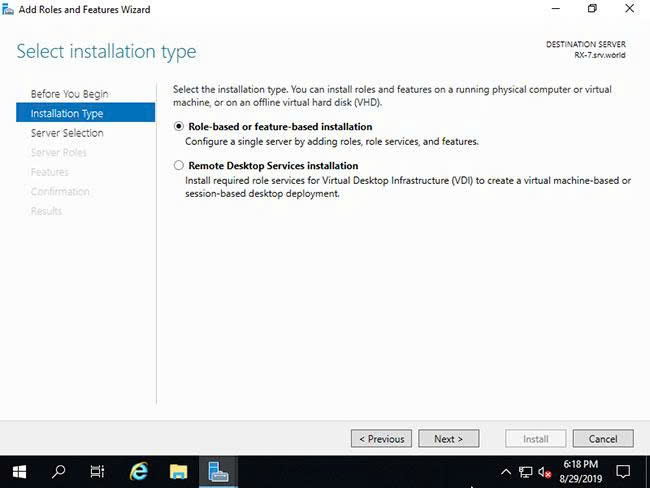
Chọn Role-based or feature-based installation.
-
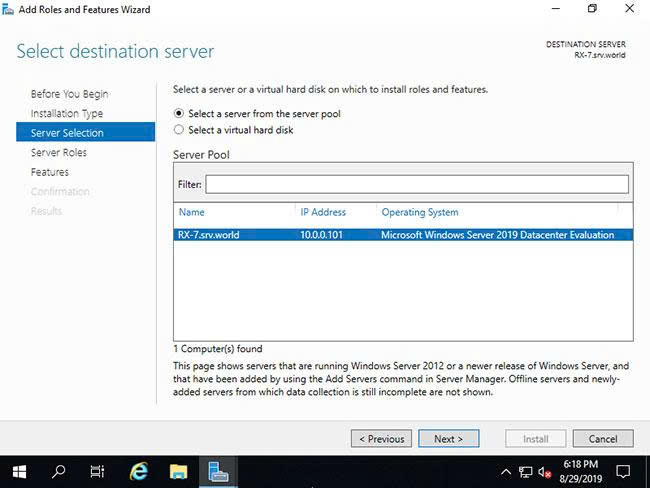
Chọn host (server) bạn muốn thêm các service.
-
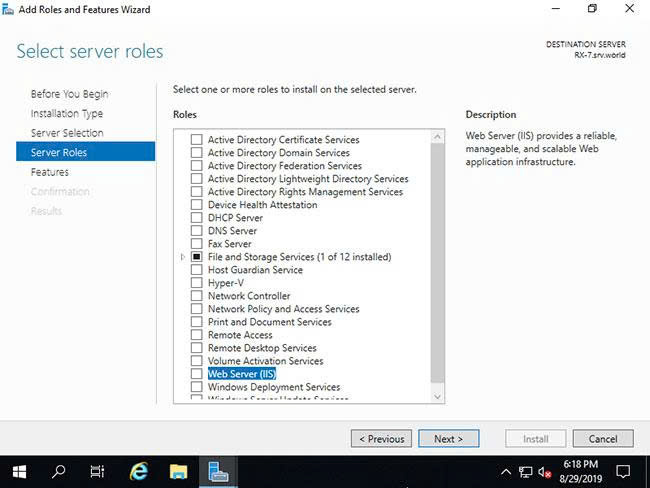
Tích vào hộp Web Server (IIS).
-
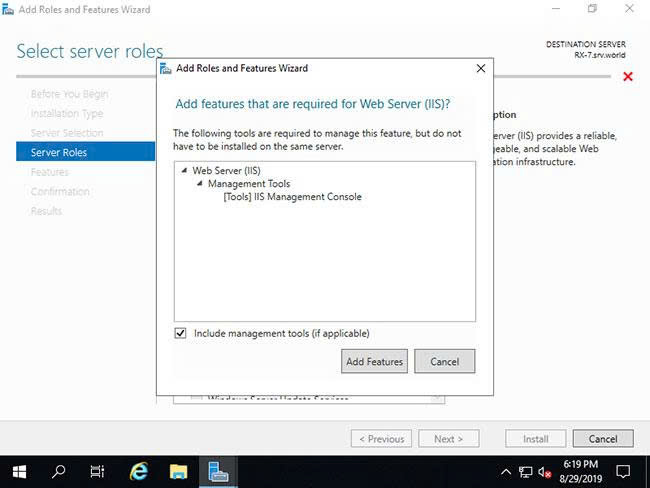
Các tính năng bổ sung được yêu cầu để thêm IIS Server — nhấp Add Features → Next.
-
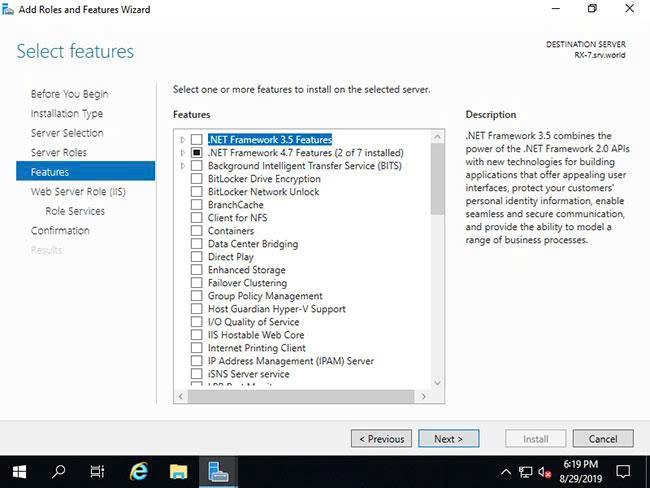
Nhấp vào nút Next (màn hình Select features).
-
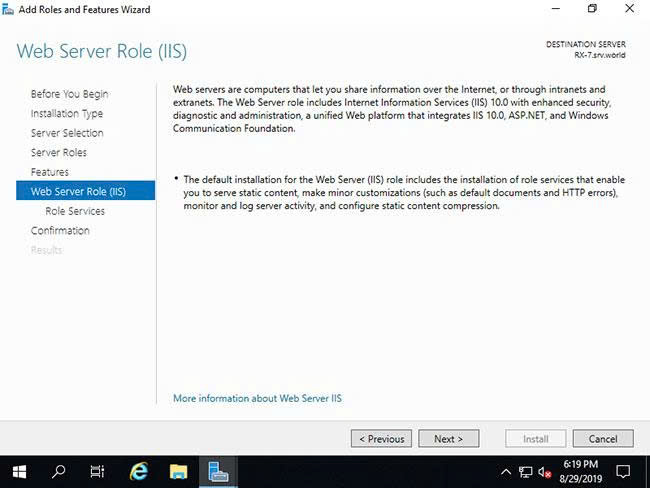
Nhấp vào nút Next (màn hình Web Server Role (IIS)).
-
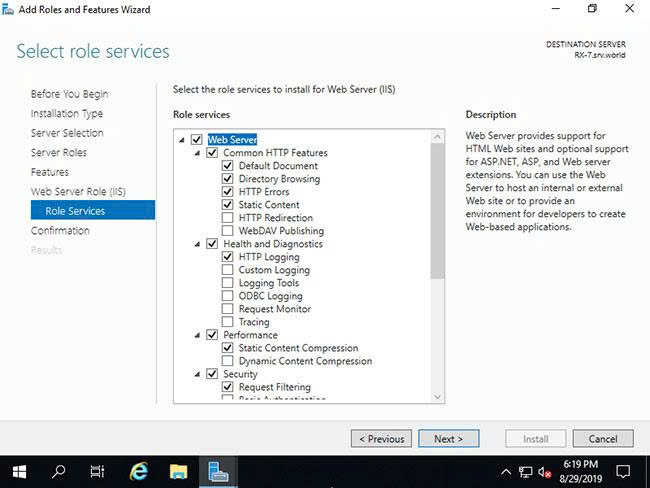
Chọn các tính năng của Web Server (giữ nguyên mặc định) — có thể thêm sau khi cài IIS.
-
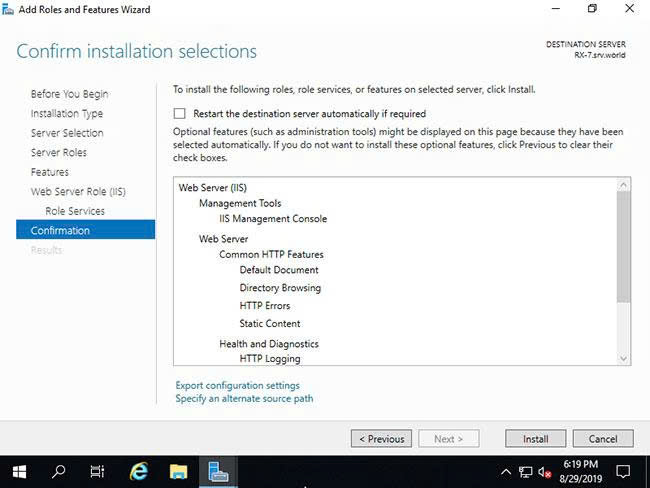
Nhấp vào nút Install.
-
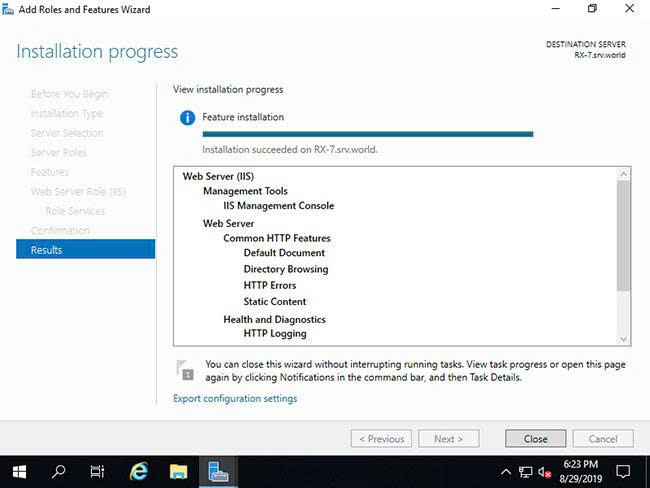
Sau khi kết thúc cài đặt, nhấp vào nút Close.
Cài đặt API
-
Tải bộ đóng gói API (Tải về) và giải nén vào thư mục (ví dụ:
D:\RMS\api_sign_rms). -
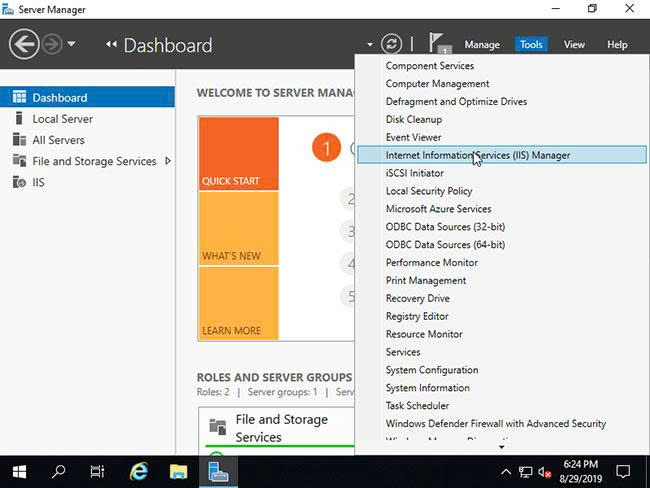
Chạy Start → Server Manager → Tools → Internet Information Services (IIS) Manager.
-
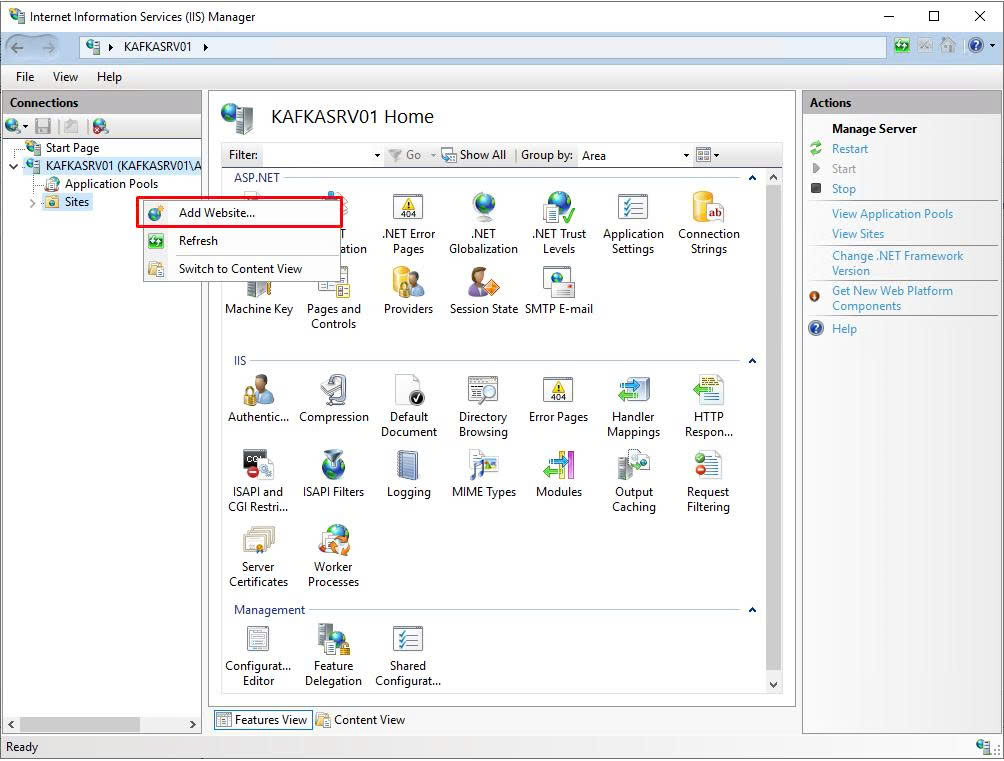
Mở các mục ở bảng điều khiển bên trái → Add Website.
-
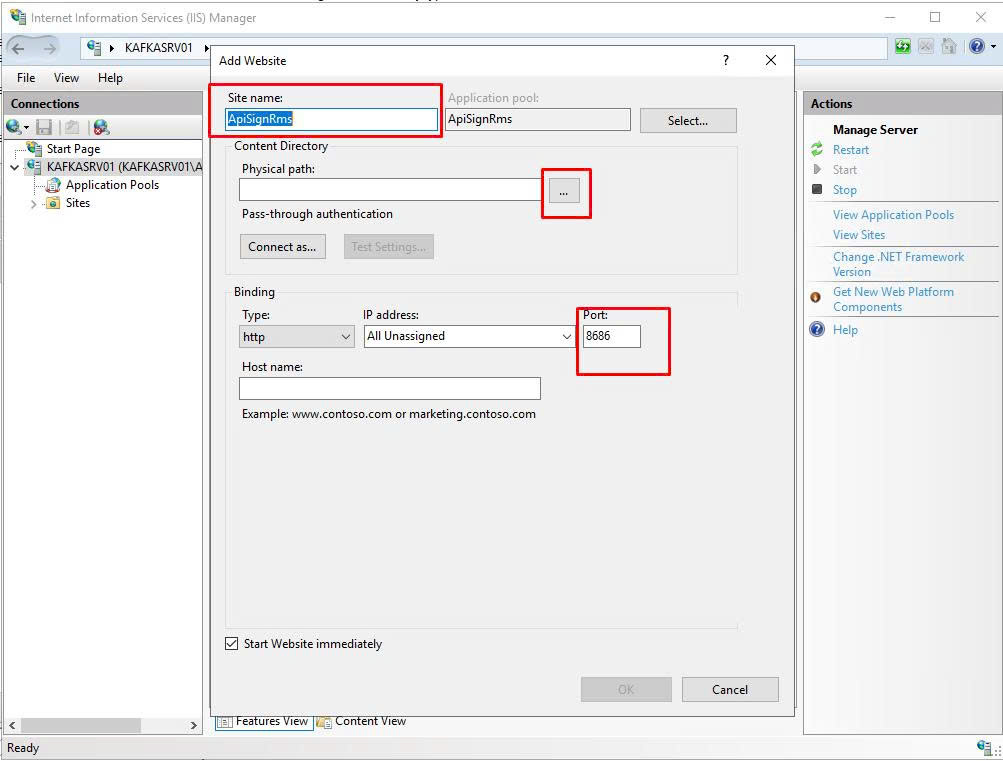
Cấu hình API (sử dụng HTTP):
-
Site name: đặt tên API (ví dụ
ApiSignRms). -
Physical path: chọn đường dẫn chứa code đã giải nén ở bước 1.
-
Port: đặt cổng cho API.
-
Vào Application Pools → chọn tên API vừa đặt → Advanced Settings → đặt Load User Profile =
True→ OK.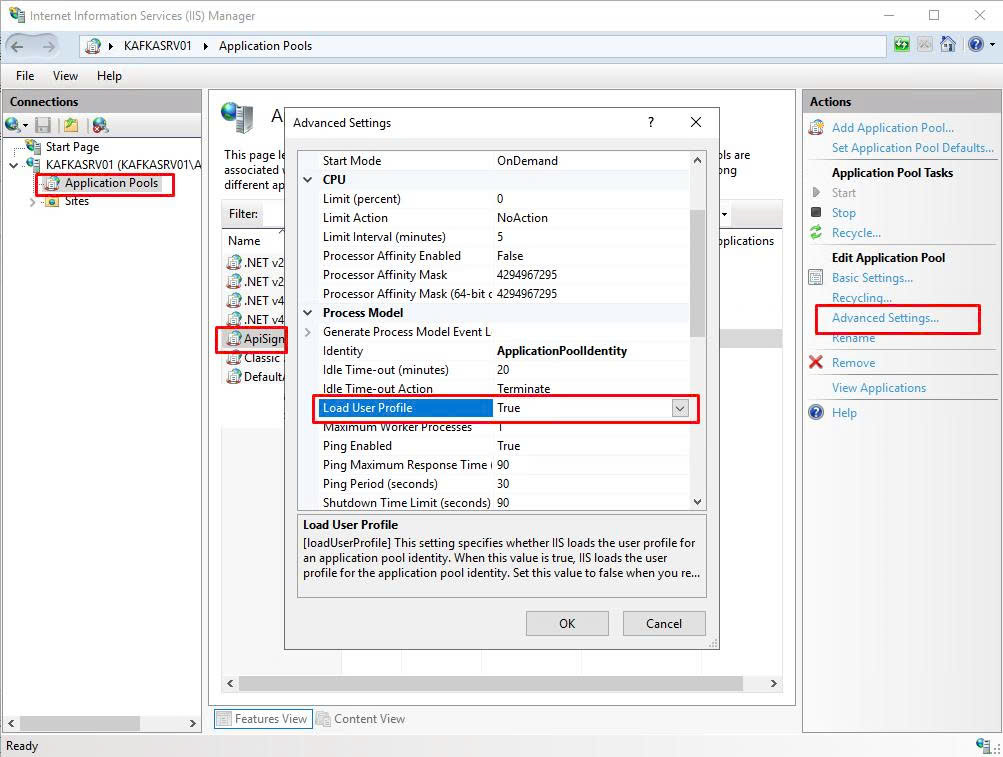
-
-
Cấu hình API (sử dụng HTTPS — khuyến nghị cho Production):
-
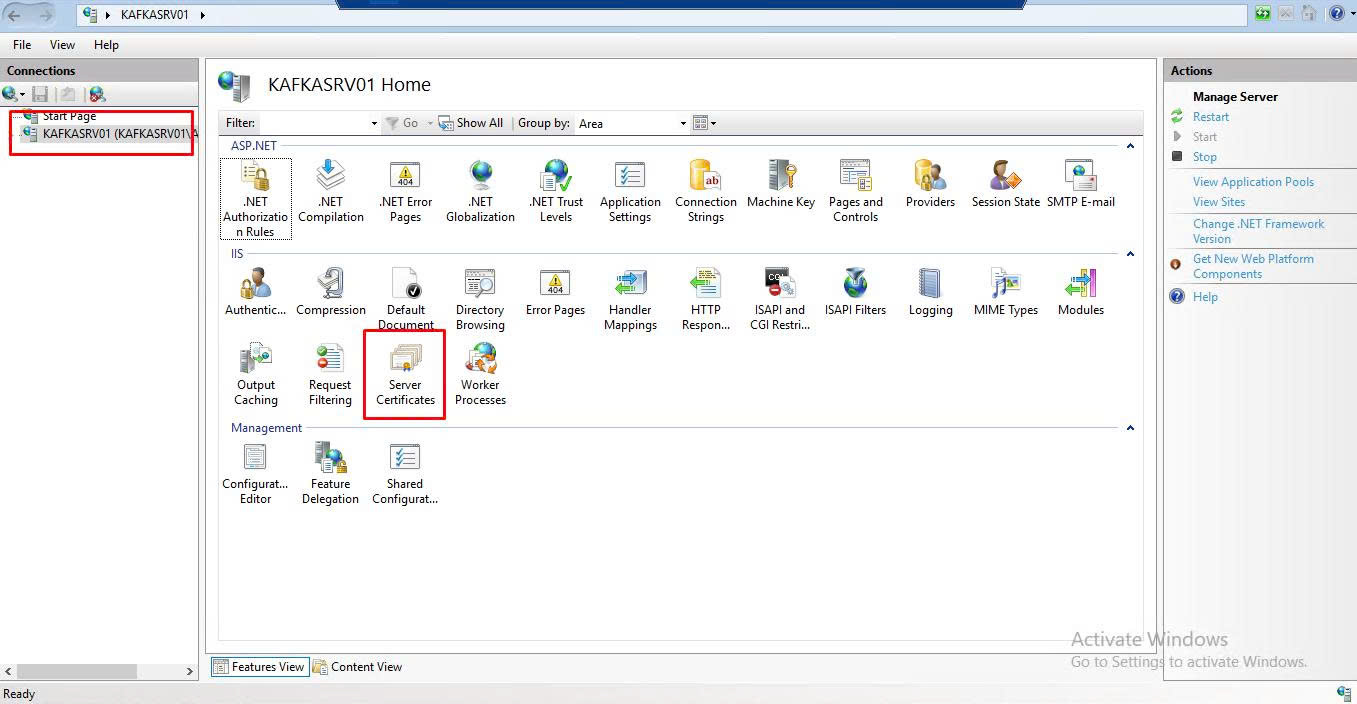
Nếu chưa import SSL: vào Server Certificates.
-
Import → chọn file cert
.pfx→ nhập Password của file cert → OK.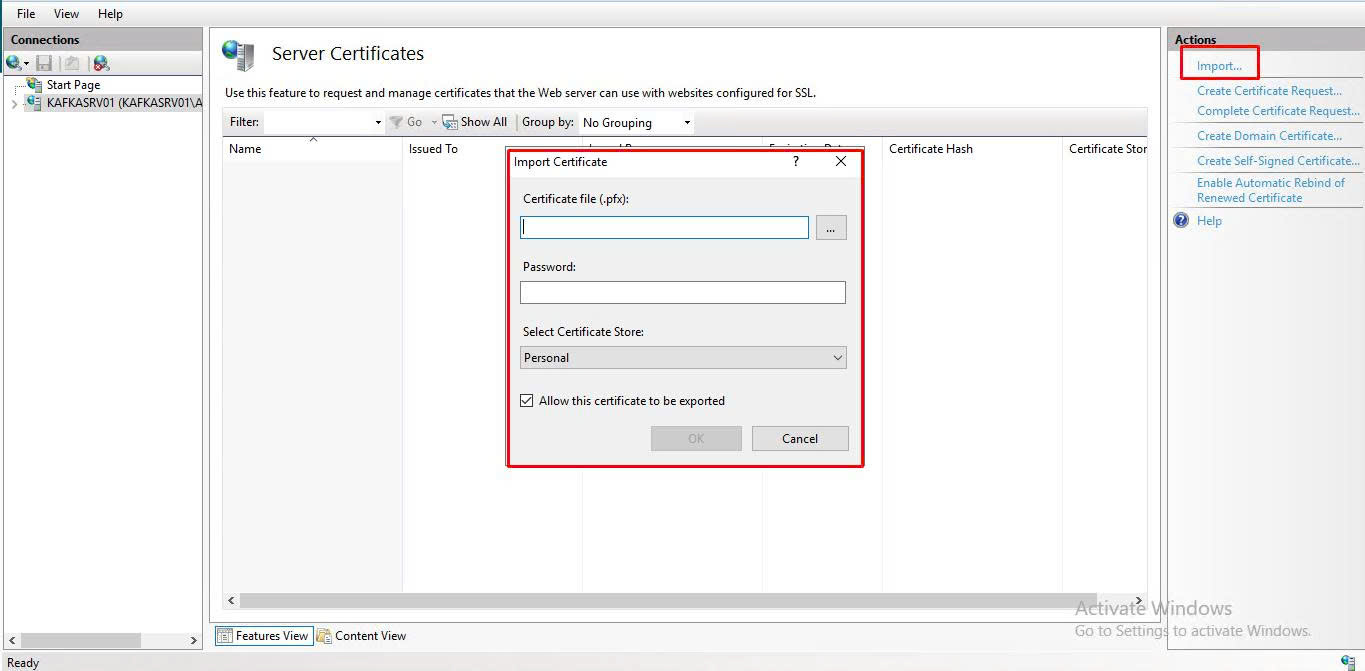
-
Add Website: Site name / Physical path như trên → Type:
https→ Port: mặc định443→ SSL certificate: chọn certificate vừa import.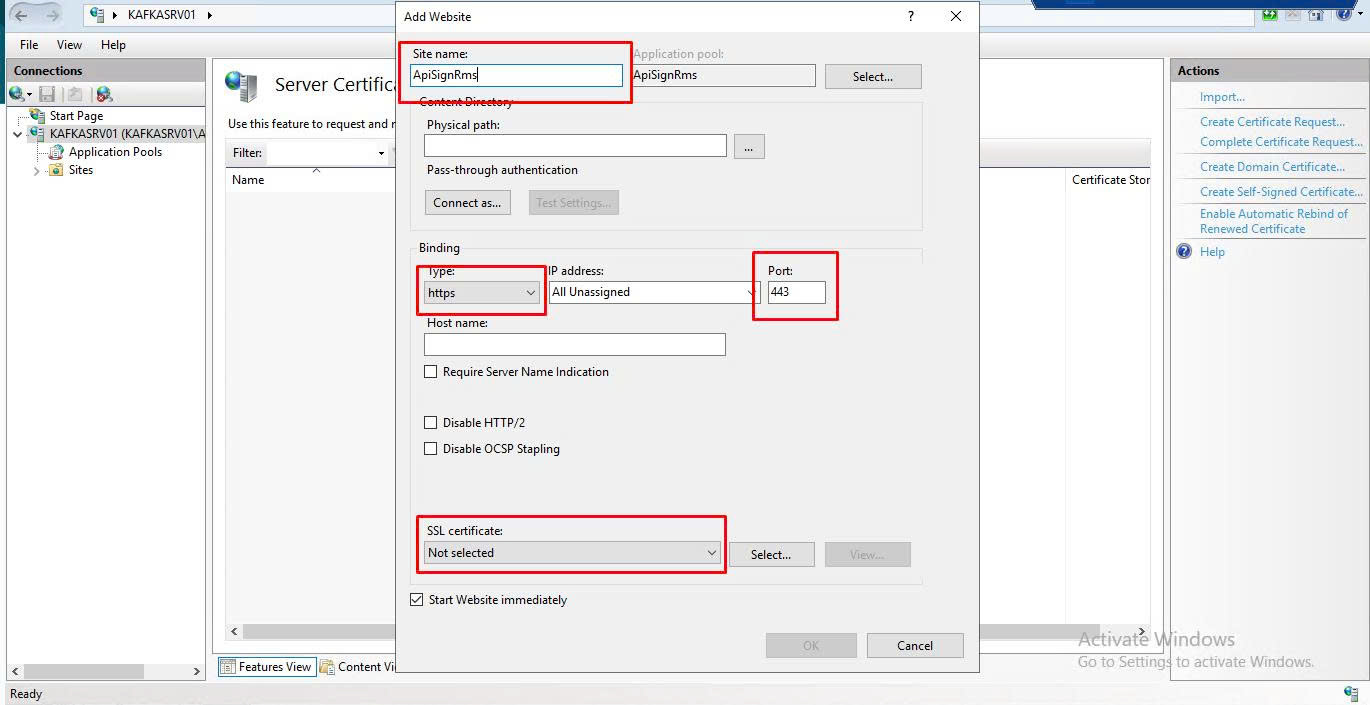
-
Cũng vào Application Pools → chọn pool tương ứng → Advanced Settings → đặt Load User Profile =
True→ OK.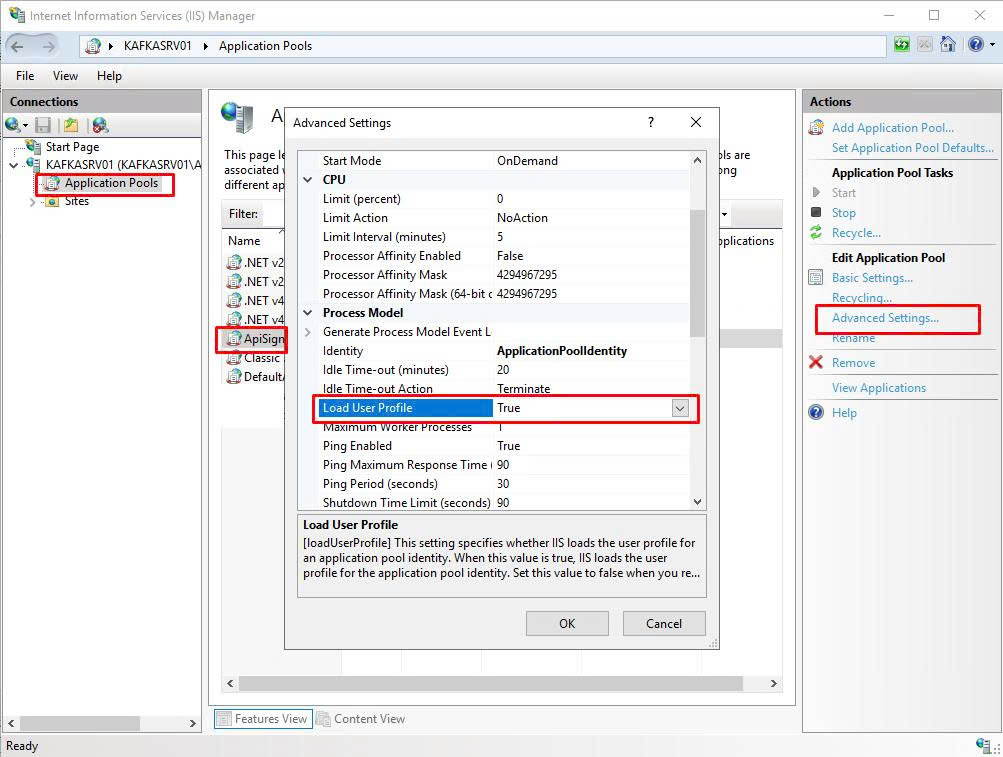
ghi chúNếu trong Server Certificates có nhiều SSL certificate của nhiều tổ chức khác nhau và các website dùng SSL của tổ chức khác nhau, tick thêm Require Server Name Indication.
-
-
Thiết lập môi trường: mở file
configRMS/config.xml(nằm trong thư mục đã giải nén) để cấu hình môi trường test hoặc production.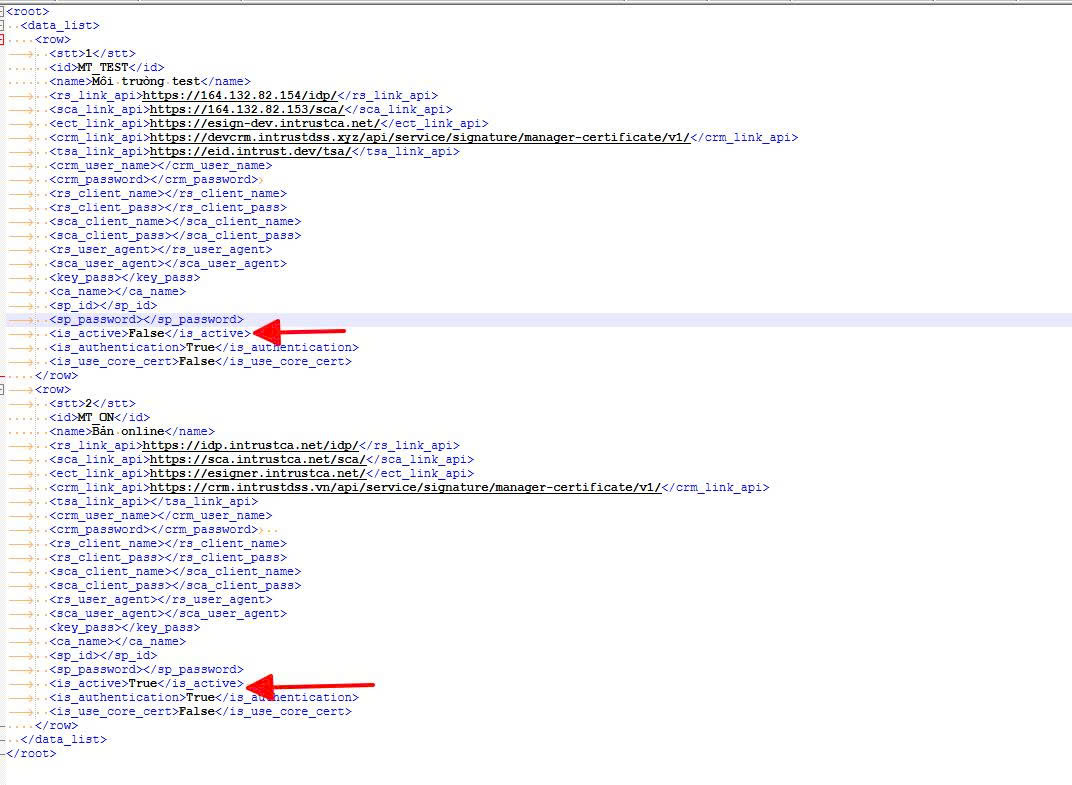
Field Diễn giải rs_link_apiEndpoint IDP (Identity Provider) sca_link_apiEndpoint SCA (Signature Creation Application) ect_link_apiEndpoint eSigner crm_link_apiEndpoint CRM — quản lý chứng thư số tsa_link_apiEndpoint TSA (Timestamp) crm_user_name/crm_passwordTài khoản kết nối CRM rs_client_name/rs_client_passClient credential cho RS (IDP) sca_client_name/sca_client_passClient credential cho SCA rs_user_agent/sca_user_agentUser-Agent định danh khi gọi RS/SCA key_passMật khẩu key ký (nếu áp dụng) ca_nameTên tổ chức CA sp_id/sp_passwordĐịnh danh/mật khẩu Service Provider is_activeTrue/False— bật đúng 1 dòng môi trường tương ứng sẽ sử dụngis_authenticationBật/tắt xác thực bổ sung is_use_core_certBật/tắt dùng core certificate Ví dụ cấu trúc
config.xmlvới 2 môi trường (MT_TESTvàMT_ON— bản online/production), các field nhạy cảm (mật khẩu, client secret) để trống theo mẫu, Partner tự điền giá trị được Intrust DSS cấp:<root><data_list><row><stt>1</stt><id>MT_TEST</id><name>Môi trường test</name><rs_link_api>https://164.132.82.154/idp/</rs_link_api><sca_link_api>https://sca.intrustca.net/sca/</sca_link_api><ect_link_api>https://esign-dev.intrustdss.xyz/</ect_link_api><crm_link_api>https://devcrm.intrustdss.xyz/api/service/signature/manager-certificate/v1/</crm_link_api><tsa_link_api>https://eid.intrust.dev/tsa/</tsa_link_api><crm_user_name></crm_user_name><crm_password></crm_password><rs_client_name></rs_client_name><rs_client_pass></rs_client_pass><sca_client_name></sca_client_name><sca_client_pass></sca_client_pass><rs_user_agent></rs_user_agent><sca_user_agent></sca_user_agent><key_pass></key_pass><ca_name></ca_name><sp_id></sp_id><sp_password></sp_password><is_active>False</is_active><is_authentication>True</is_authentication><is_use_core_cert>False</is_use_core_cert></row><row><stt>2</stt><id>MT_ON</id><name>Bản online</name><rs_link_api>https://idp.intrustca.net/idp/</rs_link_api><sca_link_api>https://sca.intrustca.net/sca/</sca_link_api><ect_link_api>https://esigner.intrustca.net/</ect_link_api><crm_link_api>https://crm.intrustdss.vn/api/service/signature/manager-certificate/v1/</crm_link_api><tsa_link_api></tsa_link_api><crm_user_name></crm_user_name><crm_password></crm_password><rs_client_name></rs_client_name><rs_client_pass></rs_client_pass><sca_client_name></sca_client_name><sca_client_pass></sca_client_pass><rs_user_agent></rs_user_agent><sca_user_agent></sca_user_agent><key_pass></key_pass><ca_name></ca_name><sp_id></sp_id><sp_password></sp_password><is_active>True</is_active><is_authentication>True</is_authentication><is_use_core_cert>False</is_use_core_cert></row></data_list></root> -
Cấu hình tài khoản xác thực Basic Auth: chỉnh sửa file
../xml/XmlData/userlist.xmlđể khai báo danh sáchusername/password(chuỗi base64, tự định nghĩa) mà ứng dụng/đơn vị gọi vào cụm API tự host này sẽ dùng để xác thực (Authorization: Basic Base64(username:password)) — xem Authentication. Ví dụ cấu trúc:<?xml version="1.0" encoding="UTF-8"?><root><data_list><row><username>DEyM2</username><password>DEyM2QDEyMDEyM2==</password><status>HOAT_DONG</status></row></data_list></root>
Tham khảo
- Cấp tài khoản kiểm thử
- API Reference và Quick Start — tài liệu hướng dẫn gọi API sau khi đã cài đặt.
- Tải bộ đóng gói API (Example Demo)