CTS Registration & Issuance Process via Portal
See the terminology and comparison table with the Native Device Authentication method on the Overview page.
1. Registration & CTS Issuance via the Provider's Portal
1.1 Registration & CTS Issuance Process
| Step | Task | Description |
|---|---|---|
| B1 | Create the subscriber | Performed directly by the IntrustDSS provider or by the Partner via the API. |
| B2 | Forward for electronic application verification | Send a notification email to the Subscriber to perform electronic application verification for CTS issuance. |
| B3 | Click the link in the Email | The Subscriber opens the email sent in B2 and clicks the link → proceeds to B4. |
| B4 | Agree to the terms of use and information security policy | The system displays the terms of use and information security policy for the Subscriber to read, understand, and confirm → proceeds to B5. |
| B5 | Draw a handwritten signature | If a photo of the Subscriber's signature already exists from another system, this step is skipped. Otherwise, the system asks the Subscriber to create a signature image to confirm the CTS issuance application. |
| B6 | Take/Upload photos of both sides of the ID card (CCCD) | If photos of both sides of the ID card already exist from another system, this step is skipped. Otherwise, the Subscriber takes a photo or selects an existing photo from the device's library → proceeds to B7. |
| B7 | WF approves the digital certificate issuance | The CKS service provider receives the application and reviews it before issuing the CTS. |
1.2 CTS Issuance Approval Process
Step 2 (Subscriber) is a loop-back point: when the application is invalid, the Subscriber redoes the electronic application verification flow in section 1.1.
| Step | Task | Description |
|---|---|---|
| B1.1 | Send email requesting re-verification | The DSS CTS provider reviews the application: if the application is invalid, it is returned by email for the Subscriber to complete → proceeds to B2. |
| B1.2 | Send CTS issuance email (username, password) | If the application is valid → send a remote signing account notification email → proceeds to B3. |
| B2 | Redo the electronic application verification flow | The Subscriber redoes the CTS electronic application verification process (see section 1.1). |
| B3 | Click the link in the Email | The Subscriber opens the email and clicks the link → proceeds to B4. |
| B4 | Log in | The system automatically logs in with the account sent in B1.2 → proceeds to B5. |
| B5 | Verify OTP | The system requests remote signing account verification via an OTP code → enter the OTP code → proceeds to B6. |
| B6 | Create a PIN code for remote signing authentication | The Subscriber creates a signing authentication PIN code → proceeds to B7. |
| B7 | Confirm the digital certificate information | The Subscriber confirms the CTS information → proceeds to B8. |
| B8 | Display the issued CTS information | Display the issued CTS information to the Subscriber. |
2. General Integration Diagram
The diagram below describes the entire flow when CTS registration/issuance is performed via the Partner's APP (instead of via the provider's Portal), including the electronic identity verification (eKYC) step using CoreCA's SDK.
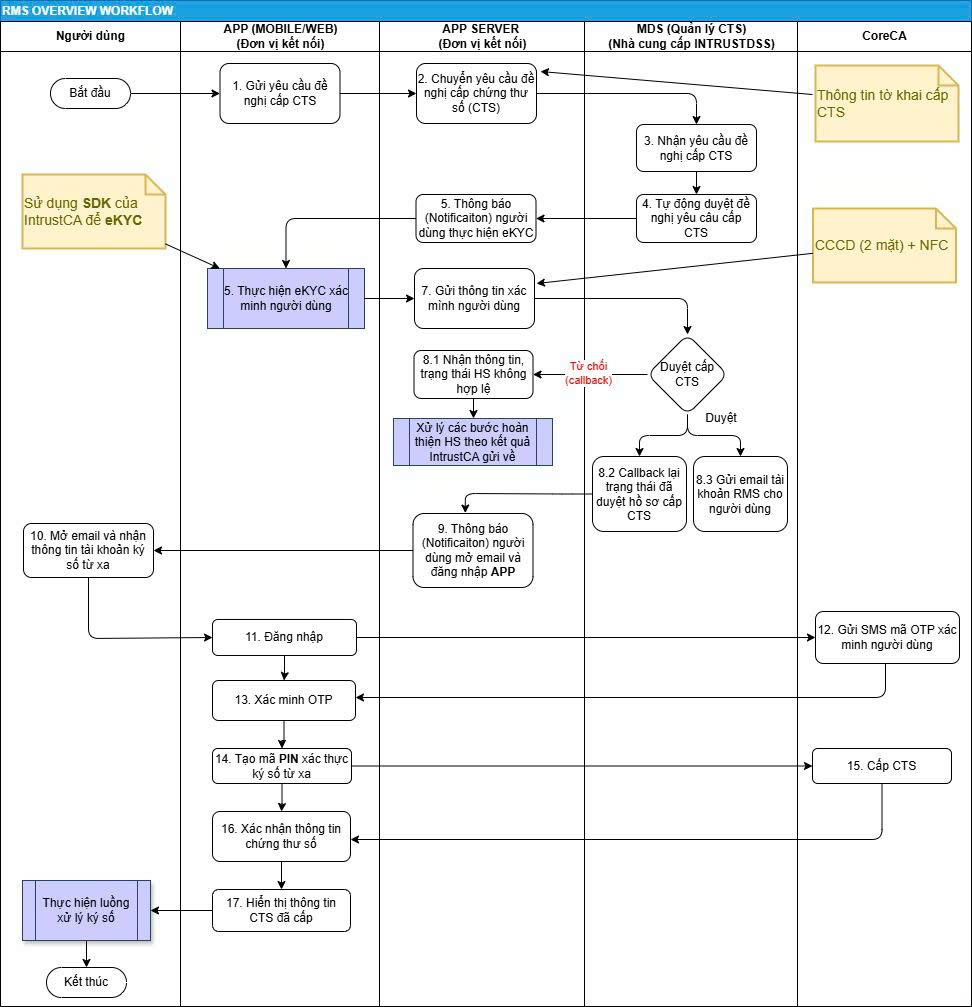
After step 17, the CTS has been issued to the user and the application can continue with the signing flow (see section 3 below, and Integration Flow for the RMS API call flow).
3. Signing with PIN Code Authentication (application perspective)
The diagram below describes the signing flow using a PIN code from the application/UX perspective (the Partner builds the screens for the Subscriber themselves). For details on the API calls (login → sign with pinCode, handling error 498), see the "PIN Code Authentication" group in the API Reference.
See the step-by-step guide for activating the PIN code at Test Account Provisioning.
See also
- Guide to Registering for CTS via Electronic Application — Remote Signing with PIN Code Authentication — step-by-step operations (specific button names, screen names) and account management operations (change/recover password, change/recover PIN code).